If you’re a small business owner looking for affordable and reliable web hosting services, Hostinger may be the perfect solution for you. With a range of hosting plans and features, Hostinger offers a user-friendly platform and excellent customer support to help you build and maintain your business website. Find out why Hostinger is the best choice for your web hosting needs.

What is web hosting and why do I need it?
Hosting refers to the service of storing your website files and data on a server so that your website can be accessed on the internet.
When you create a website, you will have a collection of web pages, images, and other files that need to be stored somewhere. Hosting companies provide the server space and technical support necessary to keep your website running smoothly.
There are many hosting options available, including shared hosting, dedicated hosting, and cloud hosting, among others. Each option has its own advantages and disadvantages, depending on your needs and budget.
In general, shared hosting is the most affordable option for small businesses and individuals, while dedicated hosting provides more resources and control for larger websites. Cloud hosting can be a good option for websites with high traffic or fluctuating resource needs.
It’s important to choose a reputable hosting provider that can provide reliable service and technical support.
What are the main reasons to consider Hostinger as my main web service provider
Affordable Pricing: Hostinger is known for its affordable pricing, making it a great option for those on a budget. The company offers a range of hosting plans to meet the needs of different users, all of which are competitively priced.
Reliable Hosting: Hostinger boasts an uptime guarantee of 99.9%, which means your website will be up and running almost all the time. Hostinger uses the latest technology and hardware to ensure that your website runs smoothly and quickly.
User-Friendly Control Panel: Hostinger’s control panel, called hPanel, is easy to use and navigate, even for beginners. It provides access to a wide range of features and settings, allowing you to manage your hosting account with ease.
Wide Range of Hosting Plans: Hostinger offers a range of hosting plans to meet the needs of different users. Whether you’re just starting out with a simple website or you need more advanced hosting options, Hostinger has a plan that will work for you.
Excellent Customer Support: Hostinger is known for its excellent customer support. The company offers 24/7 customer support via live chat, email, and phone, so you can get help whenever you need it.
Free domain name for the first year of hosting with some of its hosting plans. This can be a valuable feature for users who are looking to save money on domain registration fees.
Website Builder Tools: Hostinger’s website builder tools make it easy to create a professional-looking website without any coding knowledge. With customizable templates and a drag-and-drop editor, you can create a website quickly and easily.
Optimized for WordPress: Hostinger offers hosting plans specifically designed for WordPress websites, which can improve performance and security. With automatic updates and free SSL certificates, Hostinger’s WordPress hosting plans are a great option for those using WordPress.
Should I create a funnel instead of a complete website?
It depends on your goals and the type of business or project you have.
A website is a collection of web pages with a specific domain name that provides information about your business or project. It can be used to showcase products or services, provide information about your company or brand, and serve as a platform for content marketing.
A funnel, on the other hand, is a specific type of website designed to guide visitors through a specific sales process. Funnels are usually designed to capture leads and convert them into paying customers. They typically have a landing page that includes a lead magnet, an opt-in form, and a series of emails that guide prospects through the sales process.
If you want to establish an online presence and provide information about your business, a website may be the right choice for you. On the other hand, if your primary goal is to generate leads and sales, a funnel may be a better option.
It’s worth noting that a funnel can be a part of a larger website. For example, you could have a homepage that provides general information about your business, and a separate funnel that guides visitors through a specific sales process.
If you feel a funnel would be more inline with your business goals, but aren’t completely sure, check out our Systeme.io review.
Hostinger's Main Features
Cloudflare integration
Cloudflare is a content delivery network (CDN) and security service that can help improve website performance, speed, and security.
When you enable Cloudflare integration on your Hostinger account, your website traffic is routed through Cloudflare’s global network of servers. This can help reduce server load and improve website loading times, particularly for visitors who are located far from your server.
Cloudflare also offers security features, such as DDoS protection and firewall protection, which can help protect your website from malicious attacks and hacking attempts.
Hostinger’s Cloudflare integration is easy to set up and can be done directly from the Hostinger control panel. Once enabled, you can access Cloudflare settings and features directly from your Hostinger account.
Cloudflare provides a better user experience for your visitors.
LiteSpeed Web Server
Compared to traditional web servers like Apache, LiteSpeed is known for its faster processing speed and lower resource usage. This can result in faster website loading times, improved server stability, and reduced server load.
LiteSpeed also offers a range of optimization features, such as caching and compression, which can further improve website performance. Hostinger’s use of LiteSpeed web server can therefore be beneficial for websites that have high traffic volumes or require fast page loading times.
It’s worth noting that LiteSpeed is a paid web server software, but Hostinger offers it as part of its hosting packages at no additional cost. This makes Hostinger’s hosting services even more competitive in terms of website speed and performance optimization.
SSD Storage
Bandwidth
Hostinger offers unlimited bandwidth with its hosting plans. Bandwidth refers to the amount of data that can be transferred between your website and visitors’ browsers.
You don’t have to worry about exceeding a set limit or paying extra fees for additional data usage. This can be particularly beneficial for websites that have high bandwidth requirements, such as those that feature large files, images, or videos.
This feature allows your website to handle as much traffic as it can receive without any interruptions or slowdowns. This can result in a better user experience for your website visitors and can help improve your website’s search engine rankings.
Automatic Backups With One-Click Restoration
There are automatic backups for their customers’ websites, which can be restored with just one click. This is a great feature because it ensures that your website’s data is always safe and secure, even if something goes wrong.
The automatic backup feature takes a backup of your website’s data at regular intervals, depending on the plan you have subscribed to. This means that if your website gets hacked, or if you accidentally delete some important data, you can easily restore your website to a previous state using the one-click restoration feature.
To restore your website, you simply need to log in to your Hostinger account and go to the backups section. From there, you can select the backup you want to restore and click the “Restore” button. The process is very easy and straightforward, and you don’t need any technical knowledge to use it.
Unlimited Free SSL
How to do things with Hostinger
How to upload a website
- Log in to your Hostinger account.
- Click on the Hosting section and select the website you want to upload your files to.
- Click on the File Manager option in the left-hand menu.
- Create a new folder for your website files if you haven’t already done so.
- Click on the Upload button in the top toolbar.
- Select the files you want to upload from your computer and click Open.
- Wait for the upload to complete.
- Once the upload is complete, you can access your website by entering your domain name in a web browser.
The specific steps to upload your website may vary depending on the website builder or content management system you are using. If you’re using a website builder, you may be able to upload your website directly from the builder’s interface. If you’re using a CMS like WordPress, you may need to use a file transfer protocol (FTP) client to upload your website files to your Hostinger server.
How to choose a domain name
Choosing a domain name is an important part of establishing your online presence. Here are some steps you can follow to choose a domain name in Hostinger:
Brainstorm domain name ideas: Start by brainstorming domain name ideas that are relevant to your website’s niche or purpose. Consider using keywords that describe what your website is about, as well as catchy and memorable phrases.
Check domain availability: Use Hostinger’s domain search tool to check if the domain names you’ve brainstormed are available for registration. Hostinger will show you the availability of your desired domain name, as well as other variations of your domain name.
Choose a domain extension: Select a domain extension that best represents your website’s niche or purpose. Some popular domain extensions include .com, .org, .net, and .co.
Keep it simple and memorable: Choose a domain name that is easy to remember and spell. Avoid using hyphens, numbers, or special characters, as they can make it more difficult for people to remember your domain name.
Consider branding: Your domain name is an important part of your brand identity. Choose a domain name that reflects your brand and helps to build brand recognition.
Register your domain: Once you’ve chosen your domain name, follow the steps provided by Hostinger to register your domain name. Remember to keep your domain name registration information up-to-date and renew your domain name registration before it expires.
Choose a domain name that is relevant to your website’s niche, easy to remember and spell, and helps to build your brand identity.
How to install WordPress
Log in to your Hostinger account.
Click on the Hosting section and select the website where you want to install WordPress.
Click on the Auto Installer icon.
Select WordPress from the list of available applications.
Choose the domain you want to install WordPress on and enter a directory name if you want to install it in a subdirectory.
Enter your website name, description, username, and password for your WordPress admin account.
Click on the Install button to start the installation process.
Wait for the installation process to complete.
Once the installation is complete, you can log in to your WordPress dashboard by going to yourdomain.com/wp-admin (replace “yourdomain.com” with your actual domain name) and entering the username and password you chose during the installation process. From there, you can customize your WordPress website using themes and plugins.
How to point a domain to Hostinger
To point your domain to Hostinger, you will need to update your domain’s DNS (Domain Name System) records with the DNS settings provided by Hostinger. Here are the general steps to do this:
- Log in to your domain registrar’s website (the website where you purchased your domain name).
- Navigate to the domain management section.
- Look for an option to manage your DNS settings (sometimes called DNS management, DNS configuration, or name servers).
- Update your domain’s DNS settings to the Hostinger DNS provided by your Hostinger account.
- Save your changes and wait for the changes to propagate (usually takes 24-48 hours).
Here are the specific steps to update your domain’s DNS settings for Hostinger:
- Log in to your Hostinger account.
- Click on the Hosting section and select the website you want to point your domain to.
- Click on the Details button to view your account information.
- Look for the Nameservers section and copy the nameserver information provided by Hostinger.
- Log in to your domain registrar’s website and navigate to the domain management section.
- Look for an option to manage your DNS settings (sometimes called DNS management, DNS configuration, or name servers).
- Replace your domain’s current nameservers with the Hostinger nameservers you copied earlier.
- Save your changes and wait for the changes to propagate (usually takes 24-48 hours).
Once the changes have propagated, your domain will be pointed to your Hostinger account, and you can start using it to access your website or create email addresses.
How to create a subdomain
Log in to your Hostinger account.
Click on the Hosting section and select the website you want to create a subdomain for.
Click on the Subdomains option in the left-hand menu.
In the Subdomain section, enter the name you want to use for your subdomain in the Subdomain field.
Select the domain you want to use for your subdomain from the drop-down menu.
Choose the directory where you want to store your subdomain’s files. You can either create a new directory or use an existing one.
Click on the Create button to create your subdomain.
Once your subdomain is created, you can access it using the URL format: subdomain.yourdomain.com (replace “subdomain” with the name you chose for your subdomain, and “yourdomain.com” with your actual domain name). You can also upload files to your subdomain’s directory using FTP or the Hostinger file manager.
How to setup Hostinger email on Outlook
Open Outlook and click on the File tab in the top left corner.
Click on the Add Account button.
In the Add Account window, select the Manual setup or additional server types option and click on Next.
Choose the POP or IMAP option and click on Next.
Fill in the following information:
- Your name: The name you want to display as the sender of your emails.
- Email address: Your full Hostinger email address.
- Account type: POP or IMAP (you can find this information in your Hostinger account settings).
- Incoming mail server: mail.yourdomain.com (replace “yourdomain.com” with your actual domain name).
- Outgoing mail server (SMTP): mail.yourdomain.com (replace “yourdomain.com” with your actual domain name).
- User Name: Your full Hostinger email address.
- Password: Your Hostinger email password.
Click on the More Settings button.
In the Internet E-mail Settings window, click on the Outgoing Server tab.
Check the box for “My outgoing server (SMTP) requires authentication”.
Select the “Use same settings as my incoming mail server” option.
Click on the Advanced tab.
Set the Incoming server (IMAP) port to 993 for IMAP, or 995 for POP.
Select the SSL encryption option.
Set the Outgoing server (SMTP) port to 465.
Select the SSL encryption option.
Click on OK to save your changes.
Click on Next and Outlook will test the settings.
If the test is successful, click on Close and then Finish to complete the setup.
Once the setup is complete, you should be able to send and receive emails from your Hostinger email account through Outlook.
Speed
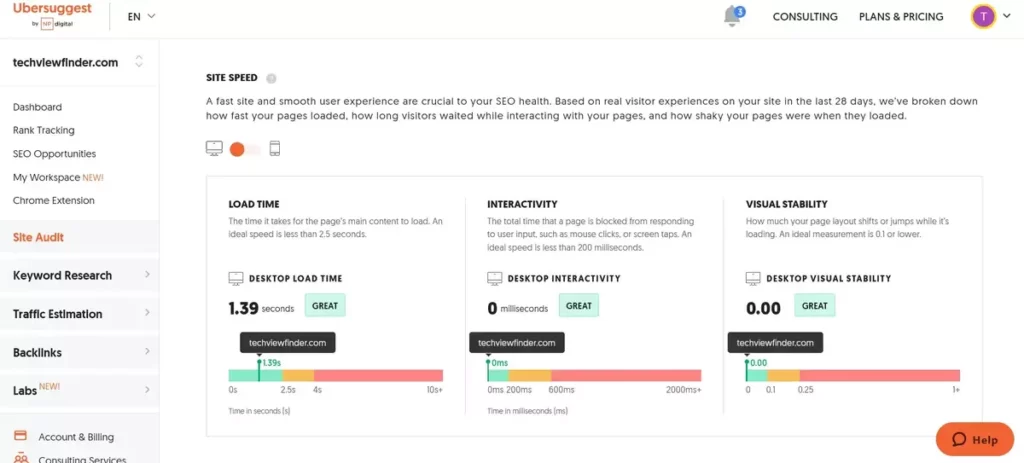
This website was created with Hostinger’s WordPress hosting Starter plan costing only $1.99 per month, and so far has not disappointed. Here is a screenshot of site stats on Ubersuggest tool.
As you can see, the results are crazy good, considering the low price.This is actually the third hosting provider we have tried with the same website, one being Dreamhost and the other Bluehost. While the results on either weren’t bad, Hostinger was up to 50% faster on the Starter plan, and the others only catch up with the more expensive plans.
What are the pricing plans
Here’s an overview of the pricing plans for some of its most popular hosting options:
Shared hosting: Starts at $0.99 per month for the Single plan, which includes one website, 30 GB of storage, and 100 GB of bandwidth. The Premium plan costs $2.89 per month and includes unlimited websites, storage, bandwidth, and email accounts. The Business plan costs $3.99 per month and includes all of the Premium plan features plus daily backups, a free SSL certificate, and a free domain.
VPS hosting: Hostinger’s VPS hosting plans start at $3.95 per month for the 1 vCPU plan, which includes 1 GB of RAM, 20 GB of storage, and 1 TB of bandwidth. The 8 vCPU plan costs $29.95 per month and includes 8 GB of RAM, 160 GB of storage, and 8 TB of bandwidth. Hostinger also offers Windows VPS hosting plans.
Cloud hosting: Hostinger’s cloud hosting plans start at $9.99 per month for the Startup plan, which includes 100 GB of storage, 3 GB of RAM, and 2 CPU cores. The Professional plan costs $18.99 per month and includes 140 GB of storage, 6 GB of RAM, and 4 CPU cores. The Global plan costs $69.99 per month and includes 300 GB of storage, 16 GB of RAM, and 8 CPU cores.
WordPress hosting: Hostinger’s WordPress hosting plans start at $1.99 per month for the Starter plan, which includes one website, 30 GB of storage, and 100 GB of bandwidth. The Business plan costs $7.99 per month and includes unlimited websites, storage, and bandwidth, as well as a free domain, daily backups, and a Jetpack Personal license. The Pro plan costs $11.59 per month and includes all of the Business plan features plus a Jetpack Premium license and a free SSL certificate.
Conclusion
Hostinger is a reliable and affordable web hosting service provider that offers a range of hosting options suitable for businesses and individuals of all sizes, but especially the ones just starting out. It provides fast loading times, reliable uptime, and a user-friendly interface for managing your website.
The domain registration is free for the first year, but you will need to pay the standard renewal fees after the first year.
The takeaway here is, absolutely try out the basic plan, as it provides more than adequate performance for a negligible price. There are always various deals like the one below, at the time of writing, that gets you 3 months free with 30-day money-back guarantee.