Systeme.io is an innovative platform that provides you with everything you need to create, manage, and promote your online business. Learn all about it in this comprehensive review – find out which features are included and how they work so you can decide if Systeme.io is the right tool for your needs.
- What are funnels and how do they compare to standard websites?
- Who is Systeme.io For And Not For?
- Systeme.io's Main Features
-
How to do things with Systeme.io
- How to create a funnel
- How To Create Deadline Funnels Using Systeme.io
- How to create an Upsell Page with Systeme.io
- How to create Workflows with Systeme.io
- How to add a course to your website
- How to create an opt-in form with Systeme.io
- How to redirect to a different page or URL
- How to create your own custom template
- How to setup a 404 page
- Do I need LinkTree if I use Systeme.io's Link-in-Bio Page
- No Noindex Detected
- How to remove the need to type "www" on your funnel address
- How to send emails directly to contact's inbox
- How to add a downloadable resource to an online resource lecture
- How to upload a Canva document as a sales page
- How to add a digital product for sale
- How to send text messages to leads
- How to integrate Facebook pixel on the systeme.io page
- How to set up TikTok pixel to Systeme.io to track conversions?
- How to set up email automation in systeme.io
- Systeme.io pricing
- Conclusion
What are funnels and how do they compare to standard websites?
Funnels are a marketing concept that refers to the journey a customer takes from initially showing interest in a product or service to making a purchase or taking a desired action. The funnel analogy is used because, like a physical funnel, the number of potential customers is wider at the top and gradually narrows down to a smaller number of actual customers at the bottom.
In the context of online marketing, a funnel usually consists of a series of web pages, each designed to guide the customer through a specific step of the buying process. These pages might include a landing page, a product page, a checkout page, and a thank-you page.
Compared to standard websites, funnels are more focused and streamlined. While a standard website might have a variety of pages and content, a funnel is designed with a specific goal in mind, such as converting a visitor into a customer. Funnels are also usually optimized for conversions, with every element of the page carefully crafted to encourage the customer to take the desired action, whether that’s making a purchase, filling out a form, or signing up for a newsletter.
Overall, funnels can help to increase conversions and make the customer journey more efficient and effective. However, they are not always necessary for every type of website or business, and there may be situations where a standard website with a more comprehensive set of pages and content is more appropriate.
If you are geared more towards creating a website, read our review of Hostinger – our top pick for web hosting.
Who is Systeme.io For And Not For?
Who is Systeme.io for?
-
Entrepreneurs and small businesses: Systeme.io is a great option for entrepreneurs and small businesses who want an all-in-one platform to manage their online business.
-
Solopreneurs: Systeme.io is a good fit for solopreneurs who want an easy-to-use platform to build their online presence without needing to hire a team of developers and designers.
-
Online course creators: Systeme.io offers features for creating and selling online courses, making it a good option for course creators who want an all-in-one platform.
-
Affiliate marketers: Systeme.io offers an affiliate program and features for managing affiliates, making it a good option for affiliate marketers who want an all-in-one platform.
-
Email marketers: Systeme.io offers email marketing features, making it a good option for businesses that want to manage their email marketing campaigns within their all-in-one platform.
Who is Systeme.io not for?
-
Large businesses: Systeme.io may not be the best fit for large businesses that require more advanced features and integrations than Systeme.io offers.
-
Businesses that rely heavily on specific third-party tools: Systeme.io may not be the best fit for businesses that require extensive integrations with specific third-party tools that are not currently supported by the platform.
In summary, Systeme.io is a perfect fit for entrepreneurs, small businesses, solopreneurs, online course creators, affiliate marketers, and email marketers looking to combine their suite of marketing tools and use only tool to manage their online business. It may not be the best fit for large businesses.
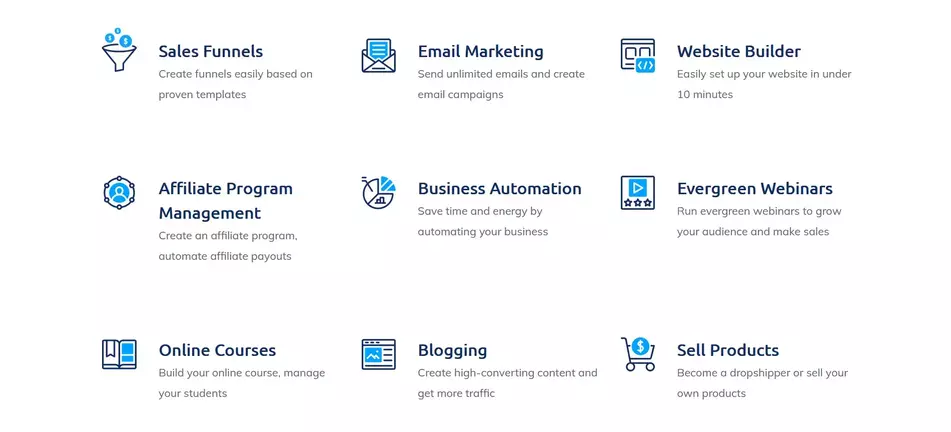
Systeme.io's Main Features
Dashboard Overview
Systeme.io has created a modern, simplified dashboard to give you an overview of your business. The dashboard contains all of the relevant information you need – statistics, analytics, and performance data – placed in neat cards so that you can find them quickly and easily. You also have access to real-time notifications, which allow you keep up with significant events.
The dashboard is divided into different sections, including:
Navigation menu: This is located on the left-hand side of the screen and provides access to all the key features of the platform, such as pages, products, email marketing, sales funnels, memberships, and more.
Quick links: This is located at the top of the dashboard and provides shortcuts to frequently used features such as creating a new page or product.
Overview: This section provides an overview of the user’s online business, including recent activity, sales, and email marketing campaigns.
Notifications: This section displays notifications related to the user’s account, such as new subscribers, sales, or membership requests.
Support: This section provides access to Systeme.io’s knowledge base, help center, and customer support.
Users can customize their dashboard by adding or removing widgets to suit their needs. For example, they can add a widget to display their website’s traffic or revenue, or remove widgets that they don’t need.
Overall, Systeme.io’s dashboard is a user-friendly and customizable tool that helps entrepreneurs manage their online businesses effectively.
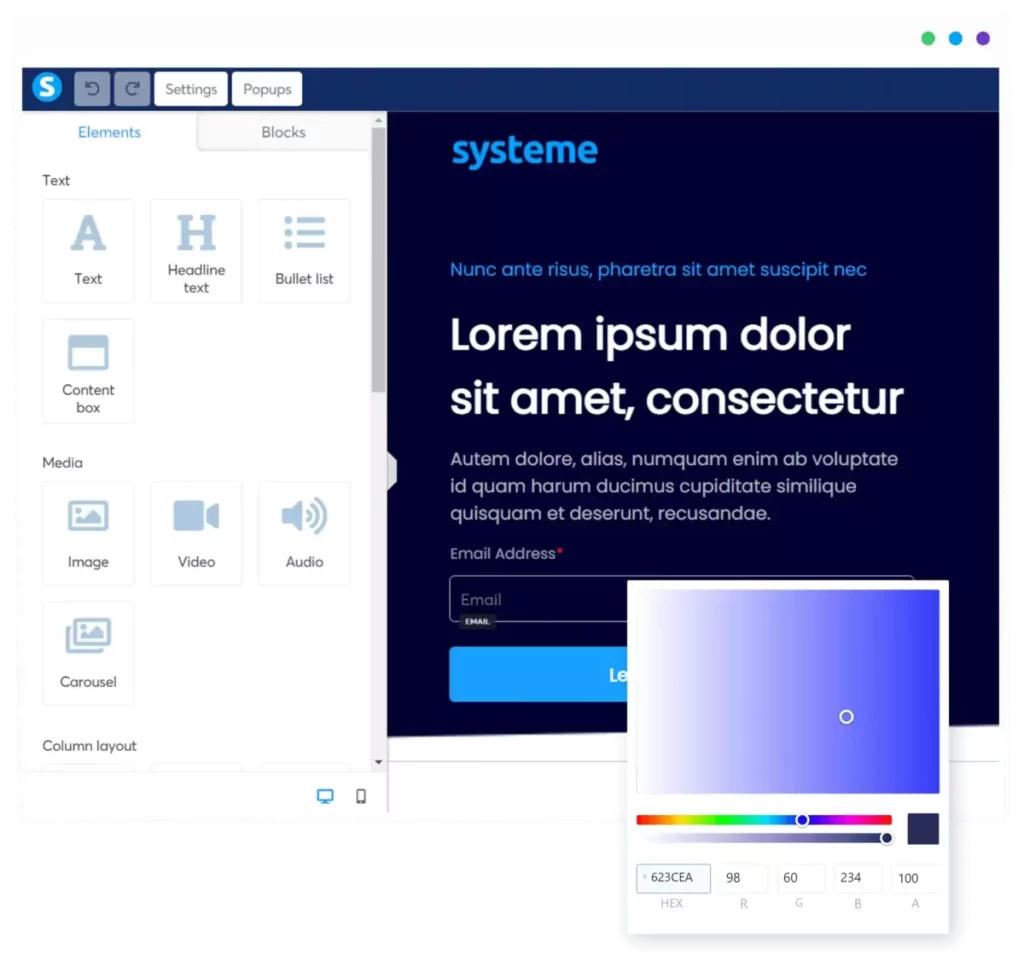
Landing Page Builder
One of the key features of Systeme.io is its landing page builder, which allows users to create beautiful and high-converting landing pages without any coding skills.
Systeme.io landing pages are designed to help users generate leads, increase conversions, and drive sales for their online businesses. The platform offers a variety of customizable templates that users can choose from, which they can then edit to match their brand’s colors, fonts, and style.
Users can add various elements to their landing pages, such as images, videos, text, buttons, and forms. They can also integrate their landing pages with other Systeme.io features, such as email marketing, CRM, and sales funnel automation.
One of the benefits of using Systeme.io’s landing pages is that they are optimized for search engines and mobile devices, ensuring that they are visible to a wider audience and can be accessed on any device. Additionally, Systeme.io provides detailed analytics and tracking tools that allow users to monitor the performance of their landing pages and make data-driven decisions to improve their conversions.
Overall, Systeme.io’s landing pages are a great tool for entrepreneurs who want to create high-quality landing pages quickly and easily to boost their online business’s performance.
Systeme.io’s sales page is a landing page designed to convert visitors into customers by presenting them with a compelling offer and providing them with all the information they need to make a purchase decision.
Here are some of the key features of Systeme.io’s sales page:
Easy customization: Systeme.io’s drag-and-drop editor allows you to customize your sales page with your branding, images, and copy. You can easily add text, videos, images, and testimonials to create a visually appealing and persuasive page.
Pre-built templates: Systeme.io offers a range of pre-built sales page templates that you can use as a starting point for your own sales page. These templates are designed to be visually appealing and optimized for conversions.
Upsell and downsell offers: You can offer upsell and downsell products or services to customers during the checkout process, increasing your revenue and average order value.
Responsive design: Systeme.io’s sales pages are designed to be responsive and optimized for all devices, ensuring a consistent user experience across desktop, tablet, and mobile devices.
Analytics: Systeme.io offers analytics tools to help you track your sales page’s performance and identify areas for improvement. You can track your conversion rate, revenue, and other key metrics.
Funnel Builder
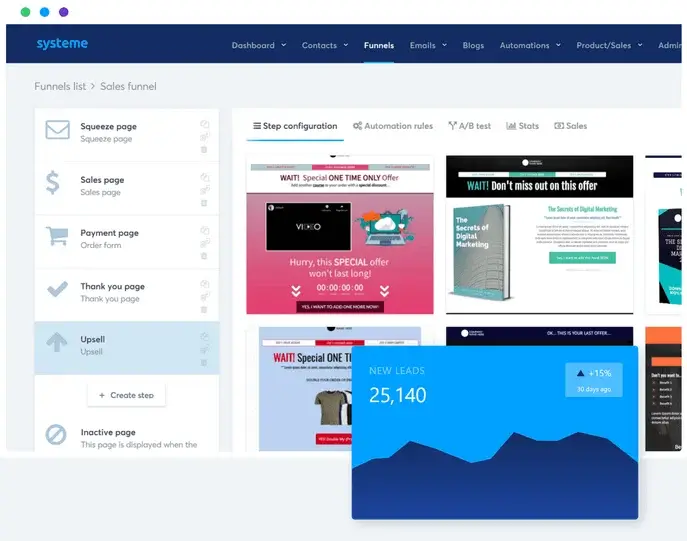
With Systeme.io’s Funnel Builder, you can customize the journey for your customers and create the perfect funnel with ease. The intuitive user interface allows you to define the entire customer journey from start to finish; you’ll have a full library of features at your disposal. You can even integrate other apps into your funnels, such as payment systems or chatbots.
Here are some of the key features of Systeme.io’s funnel builder:
Drag-and-drop interface: The funnel builder is drag-and-drop, meaning users can simply drag and drop different elements, such as landing pages, order forms, upsells, downsells, and thank you pages, into their funnels.
Multiple funnel types: Systeme.io offers different funnel types to suit different business needs, including lead generation funnels, product launch funnels, and webinar funnels.
Customization: Users can customize every element of their funnels, including colors, fonts, and images, to match their brand and style.
Automation: Systeme.io’s funnel builder allows users to set up automated email sequences, follow-up sequences, and order confirmation sequences to streamline their sales process and improve customer experience.
Analytics: Users can track the performance of their sales funnels, including conversion rates, revenue, and more, to optimize their funnel and improve their results.
Email Builder
In combination with the Funnel Builder, the Email Builder allows you to create automated emails for each step in your customer’s journey. You can use different email templates and customize them easily according to your business needs. The drag and drop editor makes creating unique emails conveniently easy and you have access to a roster of great looking elements – from buttons, custom images, to colorful backgrounds – that make your emails engaging and attractive.
Systeme.io’s email builder includes a range of features to help users create engaging emails, including:
Personalization: Users can personalize their emails with recipient names, location, and other variables.
A/B testing: Users can test different email versions to see which one performs better.
Segmentation: Users can segment their email lists to send targeted messages to specific groups of subscribers.
Automation: Users can set up automated email sequences based on subscriber behavior, such as welcome sequences, abandoned cart sequences, and more.
Analytics: Users can track the performance of their email campaigns, including open rates, click-through rates, and more.
Systeme.io’s email builder allows users to create and send effective email campaigns that engage their subscribers and drive conversions.
Automation Manager
Systeme.io’s Automation Manager allows you to automate your marketing and sales processes, saving you time and increasing your efficiency. With the Automation Manager, you can set up triggers, actions, and conditions to automate your email campaigns, sales funnels, and other marketing workflows.
Here are some of the key features of Systeme.io’s Automation Manager:
Trigger events: You can set up trigger events, such as a new subscriber joining your list, a purchase being made, or a form being submitted. These trigger events can start an automated workflow, such as sending a welcome email, adding a subscriber to a specific list, or adding a tag to a subscriber’s profile.
Actions: You can set up actions to be taken when a trigger event occurs, such as sending an email, adding a tag, or moving a subscriber to a different list.
Conditions: You can set up conditions that must be met for an action to be taken, such as the subscriber’s location, the products they’ve purchased, or their behavior on your website.
Workflow visualizer: Systeme.io’s Automation Manager includes a visual workflow builder that allows you to see and edit your automation workflows in real-time.
Email marketing automation: You can set up automated email campaigns, such as welcome series, abandoned cart reminders, and follow-up sequences.
Sales funnel automation: You can set up automated sales funnels, such as upsell sequences, downsell sequences, and order confirmation sequences.
E-commerce automation: You can set up automated e-commerce workflows, such as abandoned cart reminders, product recommendations, and post-purchase follow-up.
Affiliate Program Management
Systeme.io offers an affiliate program management feature that allows users to manage their affiliate programs directly within the platform. The affiliate program management feature is designed to help users increase their revenue by incentivizing affiliates to promote their products and services.
Here are some of the key features of Systeme.io’s affiliate program management:
User-friendly dashboard: Systeme.io’s affiliate dashboard is user-friendly and easy to navigate, allowing users to manage their affiliate program, view performance metrics, and monitor commissions.
Customizable commission structures: Users can set up custom commission structures for their affiliates, such as percentage-based commissions or flat-rate commissions.
Automated payments: Systeme.io’s affiliate program management feature allows for automated commission payments to affiliates, so users don’t have to manually process payments.
Affiliate tracking: The platform provides tracking links and cookies to affiliates so that users can track their referrals and commissions accurately.
Promotional tools: Systeme.io provides affiliates with promotional tools like banners and email templates to help them promote products more efficiently.
Systeme.io’s affiliate program management feature is a valuable tool if you’re looking to grow your business through affiliate marketing. It provides a comprehensive set of tools to manage an affiliate program effectively, saving users time and effort in managing their program manually.
Course Creation Platform
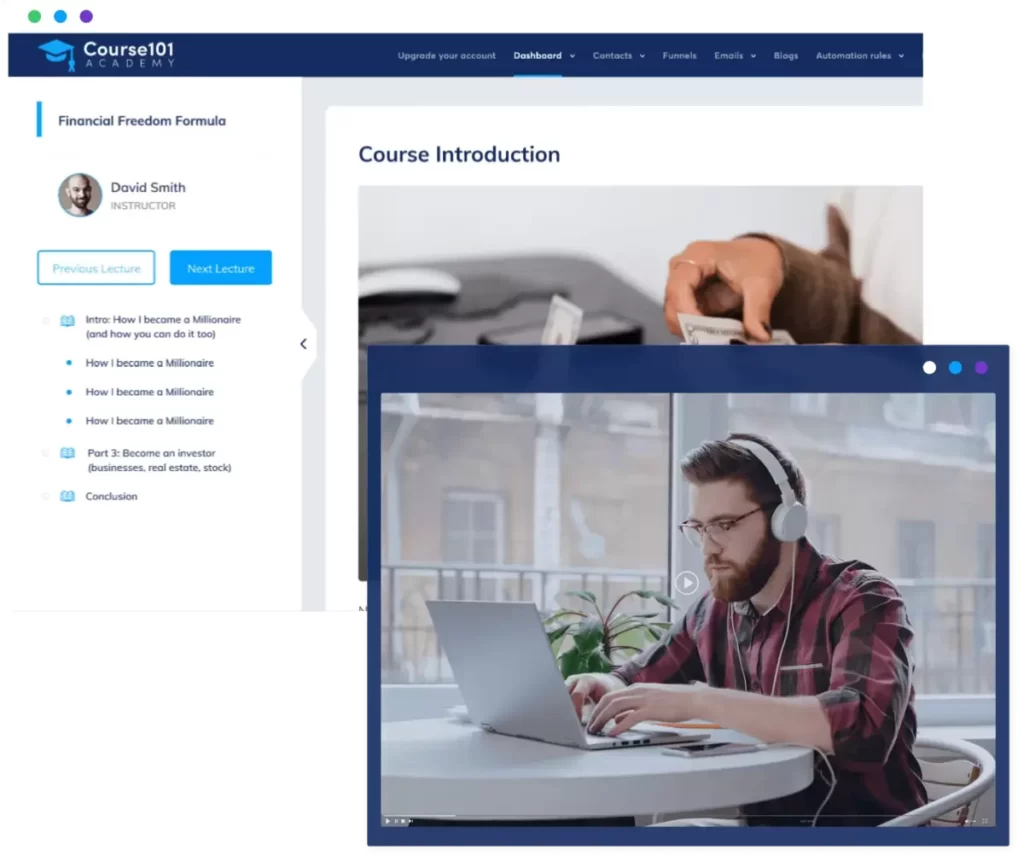
Online course platform allows users to create and sell their own courses online. The platform is designed to make it easy for entrepreneurs and educators to create engaging and effective online courses without any coding or technical skills.
Key features of Systeme.io’s online course platform:
Course creation tools: Systeme.io’s course creation tools include a drag-and-drop course builder that makes it easy to create engaging and interactive course content. Users can create text lessons, quizzes, videos, and other multimedia content to deliver a rich learning experience.
Customization: Users can customize the design of their online courses to match their brand and style. They can also create custom certificates of completion for their students.
Membership options: Systeme.io offers flexible membership options for users to control access to their courses. They can choose to offer free or paid courses, set up recurring subscriptions, and offer one-time purchases.
Course marketing: The platform includes marketing tools to help users promote their courses, such as email marketing, sales funnels, and affiliate marketing.
Student management: Systeme.io’s course platform allows users to manage their students, track their progress, and communicate with them directly.
Overall, Systeme.io’s online course platform is a powerful and flexible tool that allows users to create and sell online courses quickly and easily. The platform offers a range of features to help users create engaging and effective courses that deliver real value to their students.
Membership Site
A membership site feature allows you to create and manage a members-only area on your website. A membership site is a gated online community where you can provide exclusive content, courses, and resources to your subscribers or customers.
With Systeme.io’s membership site feature, you can easily create a custom portal for your members, where they can access your content, interact with other members, and manage their subscriptions.
Key features of Systeme.io’s membership site:
Membership levels: You can create different membership levels with different access levels and pricing options. This allows you to offer different levels of content and resources to your subscribers.
Content management: You can easily create and manage your content, including videos, audio files, text, and images. You can also organize your content into modules and lessons.
Payment processing: Systeme.io integrates with various payment gateways, allowing you to manage your subscription payments seamlessly. You can set up recurring billing, offer trial periods, and manage refunds.
User management: You can manage your members’ profiles, track their activity, and communicate with them directly from the platform.
Custom branding: You can customize your membership site’s branding to match your website and create a consistent user experience.
Automated email notifications: You can set up automated email notifications to keep your members engaged and informed about new content or upcoming events.
Analytics: Systeme.io offers analytics tools to help you track your membership site’s performance and identify areas for improvement.
This is a great tool for building a community around your content or services and monetizing your expertise.
Blogging
The blog feature is included in all of Systeme.io’s pricing plans, including the free plan.
Here are some of the key features of Systeme.io’s blog:
Customizable design: Users can customize the design of their blog to match their brand and style, including fonts, colors, and layout.
SEO optimization: Systeme.io’s blog is optimized for search engines, allowing users to improve their search engine rankings and drive more traffic to their website.
Blog post creation tools: The platform includes a user-friendly blog post editor that makes it easy to create and publish blog posts. Users can add images, videos, and other multimedia content to make their posts more engaging.
Blog post scheduling: Users can schedule their blog posts to publish at a specific date and time, making it easier to plan their content in advance.
Social sharing: Systeme.io’s blog includes social sharing buttons, allowing users to promote their blog posts on social media platforms like Facebook and Twitter.
Systeme.io’s blog feature is great for users that want to create a website, without the hassle of creating a website, and start blogging as soon as possible. You don’t have to worry about managing hosting, installing and updating plugins, fixing a crashed website, loading times, wordpress etc. Systeme.io’s whole ecosystem provides a simple and straightforward user interface that anyone can master fairly quickly.
Webinars feature
The built-in webinar tool allows you to create and host webinars.
To create a webinar on Systeme.io, you can follow these steps:
- Log in to your Systeme.io account and go to the “Webinars” section.
- Click on the “Create a webinar” button.
- Give your webinar a name and choose a date and time for it.
- Customize your webinar page by adding a title, description, and any other relevant information.
- Set up your webinar registration form and customize it to your liking.
- Configure your webinar settings, such as the webinar duration, timezone, and reminders.
- Set up any additional features, such as a chat box, polls, or offers.
- Once you’ve finished setting up your webinar, save your changes and publish it.
After you’ve published your webinar, you can promote it to your audience and invite them to register. You can also use Systeme.io’s analytics tools to track attendance and engagement, and use the data to improve future webinars.
Systeme.io Statistics
Systeme.io provides various statistics that can help you analyze the performance of your online business. Here are some of the statistics that Systeme.io offers:
Traffic statistics: Systeme.io provides traffic statistics that show you the number of visitors to your website, as well as where they are coming from and what pages they are viewing.
Conversion statistics: Systeme.io offers conversion statistics that show you the number of people who are taking a desired action on your website, such as filling out a form or making a purchase.
Email statistics: If you are using Systeme.io’s email marketing features, you can view statistics that show you the open rates, click-through rates, and unsubscribe rates of your emails.
Funnel statistics: Systeme.io provides funnel statistics that show you the conversion rates of your sales funnels, as well as the number of people who have reached each stage of your funnel.
Affiliate statistics: If you have an affiliate program set up through Systeme.io, you can view statistics that show you the performance of your affiliates, including the number of clicks and conversions they are generating.
Membership site statistics: If you have a membership site set up through Systeme.io, you can view statistics that show you the number of members, as well as their engagement with your site.
By using Systeme.io’s statistics, you can gain valuable insights into the performance of your online business and make data-driven decisions to improve your results.
How to do things with Systeme.io
How to create a funnel
To create a funnel in systeme.io, you can follow these steps:
Log in to your systeme.io account and navigate to the “Sales Funnels” section from the main menu.
Click on the “New Funnel” button to create a new funnel.
Choose the type of funnel you want to create, such as a “Sales Funnel,” “Webinar Funnel,” or “Product Launch Funnel.”
Give your funnel a name and description.
Choose the template that best fits your needs, or start with a blank template and create your own.
Add pages to your funnel by clicking on the “Add New Page” button.
Customize each page by adding your own content, images, and videos.
Set up your email automation and follow-up sequences by clicking on the “Automation” tab.
Connect your payment gateway to your funnel to start accepting payments.
Preview your funnel to ensure that everything looks and works as expected.
Publish your funnel and start driving traffic to it.
How To Create Deadline Funnels Using Systeme.io
Creating a deadline funnel using Systeme.io is a simple process that can help increase your sales by creating a sense of urgency in your audience. Here are the steps you can follow to create a deadline funnel using Systeme.io:
Create a new funnel: In your Systeme.io dashboard, click on the “Funnels” tab and select “Create Funnel.” Choose the type of funnel you want to create and give it a name.
Create your landing page: After creating your funnel, create a landing page with a call to action that encourages visitors to sign up for your offer. This landing page will be the first step in your funnel.
Create your opt-in form: Once you have your landing page, create an opt-in form that collects the email addresses of your visitors. You can use Systeme.io’s built-in form builder to create your opt-in form.
Create your email sequence: After collecting your visitors’ email addresses, create an email sequence that will be sent to them. This sequence should include a series of emails that educate and persuade your audience to take action before the deadline expires.
Set up your deadline: Using Systeme.io’s deadline feature, set the date and time for your deadline. This will create a sense of urgency in your audience and encourage them to take action before the deadline expires.
Set up your automation: Using Systeme.io’s automation feature, set up an automation that will trigger the deadline for each individual subscriber when they sign up. This will ensure that each subscriber has their own unique deadline.
Test your funnel: Before launching your funnel, test it to make sure everything is working properly. Make sure your landing page, opt-in form, email sequence, and deadline are all functioning as they should.
Launch your funnel: Once you’ve tested your funnel and made any necessary adjustments, launch it to your audience. Monitor its performance and make tweaks as needed to improve your results.
How to create an Upsell Page with Systeme.io
An upsell page is a marketing technique where you offer an additional product or service to a customer who has just made a purchase. Systeme.io allows you to create upsell pages to increase your sales and revenue.
Here are the steps to create an upsell page in Systeme.io:
- Log in to your Systeme.io account and go to the “Upsell” section.
- Click on the “Create upsell” button to start creating your upsell page.
- Choose the product or service you want to upsell and create a compelling offer. This can be a related product or an upgrade to the product the customer just purchased.
- Customize your upsell page with your branding, images, and copy. You can use Systeme.io’s drag-and-drop editor to design a visually appealing and persuasive page.
- Set up your payment processing and pricing options. You can offer a one-time payment or a subscription-based model.
- Set up your confirmation and thank-you pages, and customize them to match your branding and messaging.
- Publish your upsell page and track your performance using Systeme.io’s analytics tools.
Systeme.io also offers advanced features for upselling, such as one-click upsells and order bumps, which allow you to increase your sales without requiring additional input from the customer.
One-click upsells allow you to offer an additional product or service with just one click after the customer has made a purchase. Order bumps are small add-ons that are presented to the customer during the checkout process, increasing the average order value.
Systeme.io’s upsell page feature is great for increasing your revenue and improving your customer experience. It’s easy to use and customize, and it integrates seamlessly with other Systeme.io features, such as sales funnels and email marketing.
How to create Workflows with Systeme.io
Creating workflows with Systeme.io is a great way to automate your business processes and save time. Here are the steps to create workflows using Systeme.io:
Create a new workflow: In your Systeme.io dashboard, click on the “Automation” tab and select “Create Workflow.” Give your workflow a name and choose the trigger that will start the workflow.
Add steps to your workflow: Once you have created your workflow, you can start adding steps to it. These steps can include sending emails, adding tags, creating tasks, and more. You can add as many steps as you need to achieve your desired outcome.
Choose your conditions: You can also add conditions to your workflow that will determine which steps are executed based on certain criteria. For example, you may want to send a different email based on whether a subscriber has made a purchase or not.
Test your workflow: Before launching your workflow, test it to make sure everything is working properly. You can test your workflow by creating a test subscriber and running the workflow on them.
Launch your workflow: Once you’ve tested your workflow and made any necessary adjustments, you can launch it to your audience. Your workflow will then automatically execute based on the triggers and conditions you have set up.
Monitor your workflow: After launching your workflow, monitor its performance and make any necessary adjustments to improve its effectiveness. You can view statistics such as open rates and click-through rates to see how well your workflow is performing.
With workflows, you can focus on more important tasks while Systeme.io handles the repetitive work for you.
How to add a course to your website
Adding a course to your website in Systeme.io is easy with the platform’s built-in membership site module. Here’s how you can add a course to your website:
- Log in to your Systeme.io account and go to the “Membership” section.
- Click on “New Membership Site” and choose “Course” as the membership type.
- Give your course a name and click on “Create“.
- Click on “Add Lesson” to create your first lesson.
- Give your lesson a name and add your lesson content, such as text, images, and videos.
- Click on “Save” to save your lesson.
- Repeat steps 4-6 to create additional lessons for your course.
Once you’ve created your course, you can customize the design and layout of your membership site using Systeme.io’s drag-and-drop editor. You can also set pricing options, create coupon codes, and manage your members from the same interface.
When your course is ready, you can share the link to your membership site with your audience, and they can sign up and access your course content. You can also use Systeme.io’s automation and email marketing features to promote your course, engage with your students, and keep them motivated throughout the learning process.
How to create an opt-in form with Systeme.io
Creating an opt-in form with Systeme.io is a simple process that can help you collect email addresses and build your email list. Here are the steps to create an opt-in form with Systeme.io:
Log in to your Systeme.io account and go to the “Opt-in Forms” tab.
Click on the “Create New Opt-in Form” button.
Choose the type of opt-in form you want to create. Systeme.io offers various types of opt-in forms, including pop-ups, slide-ins, and embedded forms.
Customize your opt-in form. You can change the text, font, colors, and images to match your brand and messaging.
Set up your opt-in form settings. You can choose the list where the email addresses will be added, the form’s behavior, and other settings.
Preview your opt-in form. You can preview your form to see how it will look to your visitors.
Publish your opt-in form. Once you are satisfied with your form, you can publish it to your website or landing page.
Test your opt-in form. Before launching your opt-in form, test it to make sure everything is working properly. You can test your form by submitting your own email address and checking to see if it is added to your email list.
How to redirect to a different page or URL
Systeme.io allows you to easily redirect visitors to a different page on your website or to an external URL. Here’s how you can set up a redirect in Systeme.io:
- Log in to your Systeme.io account and go to the “Site” section.
- Click on “Pages” and select the page you want to add the redirect to, or create a new page.
- Click on the “Settings” icon on the top right corner of the page editor.
- In the “Settings” panel, scroll down to the “Redirects” section.
- Enter the URL that you want visitors to be redirected to. This can be a page on your website or an external URL.
- Click “Save” to save the redirect settings.
Once you’ve set up the redirect, visitors who land on the page will automatically be redirected to the specified URL. This can be useful if you’ve moved a page to a new URL, if you want to redirect visitors to a thank-you page after they’ve filled out a form, or if you want to redirect visitors to an external landing page or offer.
Note that when you set up a redirect, it’s important to ensure that the new page or URL is relevant to the visitor’s intent and expectations. You should also ensure that the redirect is set up correctly and doesn’t cause any technical issues, such as broken links or redirect loops.
How to create your own custom template
Systeme.io allows you to create your own custom templates for your website pages, so that you can reuse your design across multiple pages or websites. Here’s how you can create a template in Systeme.io:
- Log in to your Systeme.io account and go to the “Site” section.
- Click on “Templates” and select “Create New Template” at the top right corner of the page.
- Choose the type of template you want to create, such as a landing page, sales page, or membership site page.
- Select a pre-built template or start from scratch.
- Customize the template by adding your own branding, images, text, and design elements. Use Systeme.io’s drag-and-drop editor to make changes to the template.
- Once you’ve finished customizing the template, click on “Save as Template” at the top of the page.
- Give your template a name and description, and choose whether you want it to be a public or private template.
- Click on “Save” to save the template to your account.
Now that you’ve created your template, you can use it to create new pages for your website. When you create a new page, simply select the template you want to use and customize it with your own content. This can save you time and effort, as you can reuse your design across multiple pages and websites.
Note that when creating templates, it’s important to ensure that the design is visually appealing, easy to navigate, and optimized for conversions. You should also test your templates across different devices and browsers to ensure that they are responsive and functional.
How to setup a 404 page
Setting up a custom 404 page in Systeme.io is a good way to ensure that your visitors have a good experience when they encounter a page that doesn’t exist. Here’s how you can set up a 404 page in Systeme.io:
- Log in to your Systeme.io account and go to the “Site” section.
- Click on “Settings” and select “404 Page” from the left-hand menu.
- Click on the “Use Custom Page” toggle switch to turn it on.
- Select the page you want to use as your custom 404 page from the dropdown menu.
- Click on “Save” to save your changes.
You can also customize your 404 page by adding your own text, images, and design elements. To do this, select the page you want to use as your custom 404 page and use Systeme.io’s drag-and-drop editor to make changes to the page.
When a visitor encounters a page that doesn’t exist on your site, they will be redirected to your custom 404 page. This can help you maintain a professional and user-friendly website, even when things don’t go according to plan.
Note that it’s important to ensure that your custom 404 page provides clear and helpful information to your visitors, such as a search bar or links to popular pages on your site. This can help them find what they’re looking for and minimize frustration.
Do I need LinkTree if I use Systeme.io's Link-in-Bio Page
Linktree is a third-party tool that allows you to create a landing page with links to multiple pages and websites, often used by individuals and businesses that have a significant presence on social media. Systeme.io, on the other hand, is an all-in-one platform that offers a range of modules to help you manage and grow your online business, including website building, email marketing, sales funnels, and more.
Whether or not you need Linktree will depend on your specific goals and needs. If you’re primarily using social media to promote your business and want to provide your audience with easy access to multiple pages and websites, then Linktree may be a useful tool for you. However, if you have a dedicated website or are looking to build one, then Systeme.io’s website builder and other modules may be a more comprehensive solution for managing and growing your online business.
Ultimately, the decision to use Linktree or Systeme.io (or both) will depend on your specific needs and preferences. You may want to consider your overall business goals, the features and functionality you require, and the resources you have available when deciding which tools to use.
Having said that, here are the reasons to use exclusively Systeme.io:
- SEO: Creating your Link-in-Bio page on another application, means you’re driving traffic to another domain and not yours. Having more traffic on your domain increases your website’s credibility with search engines and helps you rank higher.
- Save time and money: The time you would spend researching and learning a new app, use it for developing your website. Choose only Systeme.io and pay for only one subscription, thus save money.
- Promote your brand and not someone else’s: With System.io’s flexibility in design and build of Your Link-in-Bio page, you are promoting your brand. Include your brand colors, Opt-ins, videos, images, carousels., etc.
- Track traffic easily: Use systeme.io’s analytics option to track all of the traffic to your website.
No Noindex Detected
If you are seeing a “no noindex detected” message in your robots meta tag in Systeme.io, it means that your website is not set up to block search engines from indexing your pages. This is generally a good thing, as it allows your website to be discovered and indexed by search engines, which can help drive traffic to your site.
However, if you want to prevent search engines from indexing certain pages on your website, you can add a noindex meta tag to those pages. Here’s how you can add a noindex tag in Systeme.io:
Log in to your Systeme.io account and go to the “Site” section.
Click on the page you want to add a noindex tag to.
Click on “Settings” and select “Advanced” from the left-hand menu.
Scroll down to the “Head Code” section and click on “Add Code“.
In the “Code” field, add the following meta tag:
<meta name=”robots” content=”noindex”>
Click on “Save” to save your changes.
This will add a noindex meta tag to the head section of your page, which will tell search engines not to index the page. Repeat this process for any other pages on your website that you want to exclude from search engine indexing.
Note that if you have already submitted your website to search engines and want to remove certain pages from their index, you will also need to use the search engine’s removal tools to request removal of those pages.
How to remove the need to type "www" on your funnel address
You can remove the need to type “www” on your funnel address in systeme.io by setting up a custom domain.
Here are the steps to set up a custom domain in systeme.io:
Purchase a domain name from a domain registrar such as GoDaddy, Namecheap, or Google Domains.
Log in to your domain registrar account and locate the DNS settings for your domain.
In the DNS settings, create a CNAME record for your domain and point it to your systeme.io account. The CNAME should be set to your account’s “subdomain.systeme.io” address.
In your systeme.io account, go to the “Settings” section and click on “Custom domains.”
Click on the “Add custom domain” button and enter your domain name.
Follow the instructions to verify your domain ownership.
Once your domain is verified, select it as the primary domain for your funnel.
Finally, you can set up a redirect from the non-www version of your domain to the www version by adding a redirect rule in your systeme.io account’s custom domain settings.
After completing these steps, your visitors can access your funnel without typing “www” in the URL.
How to send emails directly to contact's inbox
To increase the chances of your emails going directly to your contact’s inbox in systeme.io, you can follow these best practices:
Use a professional email address: Use an email address that represents your business or brand, rather than a personal email address.
Use a clear and compelling subject line: Write a subject line that accurately reflects the content of your email and encourages your subscribers to open it.
Personalize your emails: Use your subscriber’s name in the greeting and throughout the email to make it more personalized.
Segment your email list: Divide your email list into smaller groups based on their interests or behavior, and send targeted emails to each group.
Avoid spam triggers: Avoid using spammy words and phrases in your emails, such as “free,” “money-back guarantee,” and “buy now.”
Use a reputable email service provider: Use a reputable email service provider, such as systeme.io, to send your emails. These providers have a good reputation with internet service providers (ISPs) and are less likely to be marked as spam.
Ask subscribers to whitelist your email address: Encourage your subscribers to add your email address to their email contacts or whitelist it to ensure that your emails are delivered to their inbox.
By following these best practices, you can increase the chances of your emails going directly to your contact’s inbox in systeme.io.
How to add a downloadable resource to an online resource lecture
To add a downloadable resource to an online resource lecture in systeme.io, you can follow these steps:
Log in to your systeme.io account and navigate to the lecture you want to add the downloadable resource to.
Click on the “Edit” button to open the lecture editor.
Click on the “Add Resource” button in the toolbar.
Choose the type of resource you want to add, such as a file or link.
Upload your file or enter the URL of your resource.
Choose whether you want to display the resource inline or as a downloadable link.
Enter a title and description for the resource.
Click on the “Save” button to save your changes.
Preview your lecture to ensure that the resource is displaying correctly.
By following these steps, you can easily add a downloadable resource to an online resource lecture in systeme.io. Your students will be able to access and download the resource from within the lecture.
How to upload a Canva document as a sales page
You can upload a Canva document as a sales page in systeme.io by following these steps:
Log in to your Canva account and open the document you want to use as a sales page.
Click on the “Download” button in the top right corner of the Canva editor.
Choose the file type you want to download your document as, such as a PDF or image file.
Save the downloaded file to your computer.
Log in to your systeme.io account and navigate to the “Sales Funnels” section from the main menu.
Click on the funnel you want to add the sales page to, and then click on the “New Page” button.
Choose the “Custom Page” option and give your page a name.
Click on the “Edit with drag & drop builder” button to open the page editor.
Drag and drop a “Custom HTML” block onto the page where you want to add the Canva document.
Click on the “HTML” tab in the block editor, and then paste the HTML code for your Canva document.
Click on the “Save” button to save your changes.
Preview your sales page to ensure that it’s displaying correctly.
By following these steps, you can upload a Canva document as a sales page in systeme.io. Your sales page will be customized to match your brand and can help increase conversions for your sales funnel.
How to add a digital product for sale
Log in to your systeme.io account and navigate to the “Products” section from the main menu.
Click on the “New Product” button to create a new digital product.
Choose the type of product you want to sell, such as an e-book or video course.
Enter the product name, price, and description.
Upload any files or resources associated with the product.
Choose the payment options you want to offer, such as credit card or PayPal.
Set up any automated email sequences or delivery options for the product.
Click on the “Save” button to save your product.
Navigate to the “Sales Funnels” section and click on the funnel you want to add the product to.
Drag and drop a “Product” block onto the page where you want to sell the product.
Choose the product you want to sell from the dropdown menu.
Customize the block settings, such as the button text and color.
Save your changes.
Preview your blog page to ensure that the product is displaying correctly.
How to send text messages to leads
-
To send text messages to leads in systeme.io, you can follow these steps:
-
Log in to your systeme.io account and navigate to the “Leads” section from the main menu.
-
Select the leads you want to send a text message to by checking the boxes next to their names.
-
Click on the “Actions” dropdown menu and choose “Send Text Message.”
-
Enter the message you want to send to your leads. You can customize the message using merge tags to personalize it.
-
Choose the phone number you want to send the message from. You can use a number provided by systeme.io or use your own number.
-
Preview your message to ensure that it’s displaying correctly.
-
Click on the “Send” button to send the message to your selected leads.
Text messages can be a powerful tool for reaching your leads and increasing conversions. It’s important to follow best practices for text message marketing, such as obtaining consent from your leads and sending relevant, timely messages.
-
How to integrate Facebook pixel on the systeme.io page
Log in to your Facebook Ads Manager account and go to the Events Manager section.
Click on the “Connect Data Sources” button and select “Web.”
Choose “Facebook Pixel” and click “Connect.”
Follow the prompts to set up your Facebook Pixel.
Once you have created your pixel, copy the pixel code provided by Facebook.
Log in to your systeme.io account and navigate to the page on which you want to install the pixel.
Click on the “Settings” button and select “Integrations.”
Scroll down to the “Custom Scripts” section and paste the Facebook Pixel code into the box.
Click “Save” to save your changes.
Finally, test your Facebook Pixel to ensure that it’s working properly. You can do this by using Facebook’s Pixel Helper tool or by checking your Events Manager dashboard for any activity associated with your pixel.
Once your Facebook Pixel is properly installed, you can use it to track user behavior on your systeme.io page and to create targeted Facebook ads based on that behavior.
How to set up TikTok pixel to Systeme.io to track conversions?
1. Create a TikTok Pixel:
– Log in to your TikTok Ads Manager account.
– Go to “Events” in the top navigation menu.
– Click on “Create Pixel” and follow the setup instructions. You’ll get a pixel code.
2. Install the TikTok Pixel on systeme.io:
– Access the backend of your systeme.io website.
– Locate the header section of your website’s code. This is typically in the HTML or through your website builder settings.
– Paste the TikTok pixel code into the header section. Make sure it’s included on all the pages where you want to track conversions.
3. Set Up Custom Conversions on TikTok:
– In TikTok Ads Manager, navigate to “Events” and select “Custom Conversions.”
– Create custom conversion events based on the actions you want to track on your systeme.io site. For example, if you want to track purchases, set up a custom conversion for completed purchases.
4. Implement Event Tracking:
– Modify the TikTok pixel code on your systeme.io site to include event tracking. You’ll need to add specific event codes to the relevant pages, such as the code to track a purchase completion on your checkout page.
5. Test and Verify:
– After implementing the pixel and event tracking, thoroughly test it to ensure it’s working correctly. You can use TikTok’s Event Manager to monitor pixel activity and verify that conversions are being tracked.
6. Optimize Your TikTok Campaigns:
– Once your conversions are being tracked, use this data to optimize your TikTok ad campaigns by focusing on the ads and targeting that drive the most conversions.
How to set up email automation in systeme.io
To set up email automation in systeme.io, follow these steps:
Log in to your systeme.io account and navigate to the “Emails” section.
Click on the “Automation” tab.
Click on the “Create a new automation” button.
Choose a trigger for your automation. This could be a specific action, such as when someone signs up for your email list, makes a purchase, or abandons a cart. Alternatively, you can choose to trigger your automation based on a specific date or time.
Set up your automation sequence by creating a series of emails that will be sent automatically to your subscribers or customers. You can customize each email with specific content, images, and calls to action.
Use systeme.io’s segmentation and tagging tools to target specific groups of subscribers or customers with different automated email sequences.
Test your automation to ensure that it’s working properly. You can do this by creating a test subscriber or customer and monitoring the email sequence to see if the correct emails are being sent at the right time.
Finally, monitor your automation performance by tracking open rates, click-through rates, and other key metrics. Use this data to optimize your email automation and improve your results over time.
By setting up email automation in systeme.io, you can save time and improve your marketing effectiveness by delivering targeted, relevant messages to your subscribers and customers at the right time.
Systeme.io pricing

Systeme.io offers a free plan that allows users to test the platform’s features before committing to a paid plan. The free plan includes some basic features, including:
- 3 products
- 3 sales funnels
- 1 custom domain
- Unlimited bandwidth and storage
- 1000 email subscribers
- Page builder with limited templates
- Checkout and payment processing
The free plan is a great option for entrepreneurs who are just starting and want to test the waters before investing in a paid plan. However, it is important to note that the free plan has some limitations and may not provide all the features that users need to grow their business. Users who require additional features such as membership sites, webinar funnels, or more email subscribers will need to upgrade to a paid plan.
It’s also worth noting that the free plan is not intended for long-term use, and Systeme.io reserves the right to delete accounts that have been inactive for more than 6 months. Therefore, users who are serious about growing their online business should consider upgrading to a paid plan to access all the features and benefits of the platform.
Here is an overview of Systeme.io pricing:
- Startup plan: This plan costs $27 per month and includes features such as:
- Unlimited products and pages
- 5,000 email subscribers
- One membership site
- One custom domain
- Sales funnels
- Affiliate management
- 0% transaction fees
- Webinar plan: This plan costs $47 per month and includes all the features of the Startup plan, plus:
- Webinar funnels
- Webinar recording and replay
- Webinar chat and polls
- Unlimited attendees
- Enterprise plan: This plan costs $97 per month and includes all the features of the Webinar plan, plus:
- 15,000 email subscribers
- 3 membership sites
- Priority support
- Priority access to new features
It’s important to note that these prices are subject to change, and there may be additional costs for features such as SMS marketing and additional custom domains.
Payment is handled by Stripe, a third-party payment processor that is integrated with Systeme.io. When you sign up for Systeme.io, you will need to enter your payment information, such as your credit card details, and Stripe will process your payments on a recurring basis.
Systeme.io offers different pricing plans with various features and functionality, and you can choose the plan that best fits your needs and budget. You can also upgrade or downgrade your plan at any time, depending on your changing business requirements.
Overall, the pricing is very attractive, especially when compared to its competitors, Clickfunnels and Kartra, which are over 3 times more expensive and don’t really offer any more features.
Conclusion
Systeme.io is a powerful and flexible platform that can help you build and grow your online business. With its all-in-one features, you can save time and money by managing all aspects of your business in one place. Whether you’re just getting started with your online business or you’re looking for a more efficient way to manage your existing operations, Systeme.io is definitely worth checking out!
It was a little over my head at times, but we are a small business owner and trying to learn more and more about marketing. I love the funnel concept.
Thank you so much for the help you have provided.
Funnel Marketing Expert
I was curious if you ever thought of changing the structure of your website?
Its very well written; I love what youve got to say.
But maybe you could a little more in the way of content so people
could connect with it better. Youve got an awful lot of text for only having 1 or 2
images. Maybe you could space it out better?
Thank you for the observation. We are in the process of creating more images and infographics.
Amazing blog! Is your theme custom made or did you
download it from somewhere? A design like yours with a few simple adjustements would really make my blog shine.
Please let me know where you got your theme. Kudos
Hey thanks!
It is a default Astra theme.